
GDPR (General Data Protection Regulation), an important law for website owners. Every site owner, especially those doing business in the European market, is worried about it and making their website compatible with GDPR.
So what the heck is this?
GDPR is a privacy and right to be forgotten law introduced by the European Union to secure the privacy and data of their residents.
According to the law, you can not cullect any Personal Identifiable Information without the consent of users. Also, a user can request you to delete or modify their information at any time. To know more about GDPR, you can watch this detailed video.
Joomla took this very seriously and with the introduction of Joomla 3.9, they have released a The Privacy Suite Toul that allows you to make your Joomla website compatible with GDPR without any third-party extensions.
No doubt, there are many advanced 3rd party Joomla GDPR extensions available in the market but we will not discuss them here. Here we will focus on Joomla’s built-in features.
Key Highlights of Joomla’s Privacy Feature
The new privacy suite is not just to display a cookie law or privacy pulicy box on the Joomla website. But they have added a lot of new features and options to make it easy for the administrators to handle the privacy of their customers or visitors.
- It's now easier to get user consent when you're recording their data.
- There's a new component to manage data requests from users.
- There's an API for extension developers so they can report the data they cullect.
How to Use Built-in Privacy Features?
Joomla has created a brand new component or you can say a dashboard to manage all the features related to GDPR and Privacy. To access the dashboard, navigate to Users > Privacy.
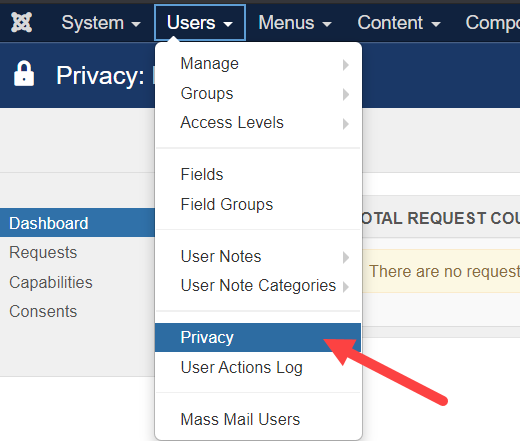
From here you can manage the user consents, manage data requests from users and have extra information for 3rd party extensions.
It provides different plugins for different purposes. And further, in this article, we will look into those.
How to Gain User Consent with Joomla’s Privacy Suite?
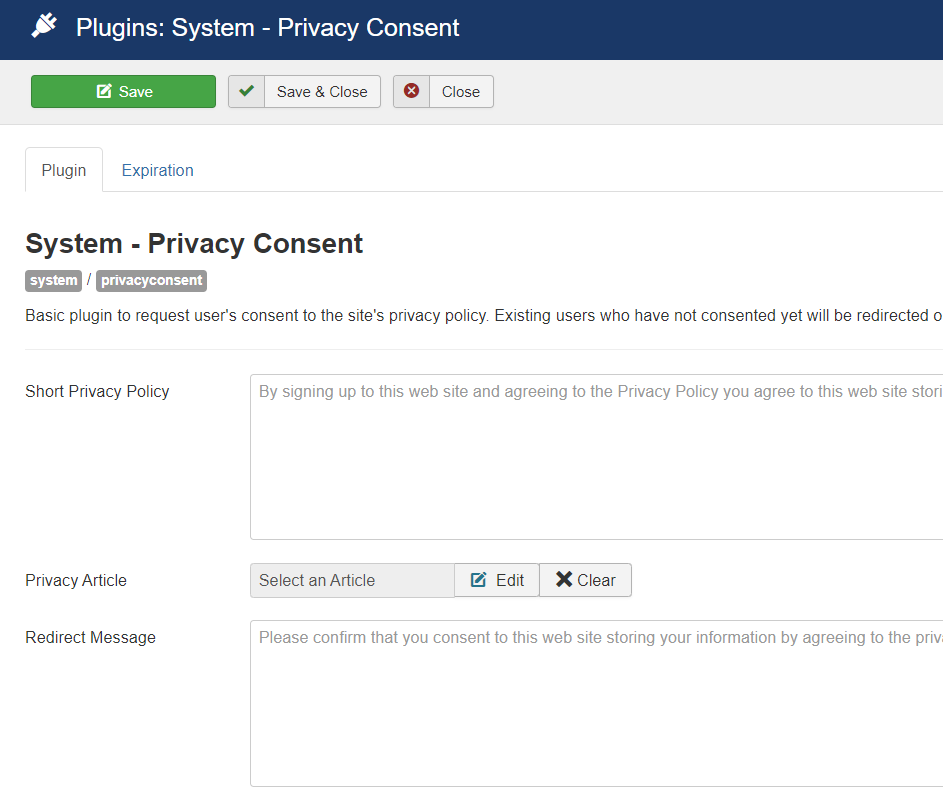
According to the GDPR, before storing any personally identifiable information on your website, you need to take the full consent of users. For this purpose, Joomla has a new "System - Privacy Consent" plugin to make it easier to get this consent.
To work with it, fullow the steps.
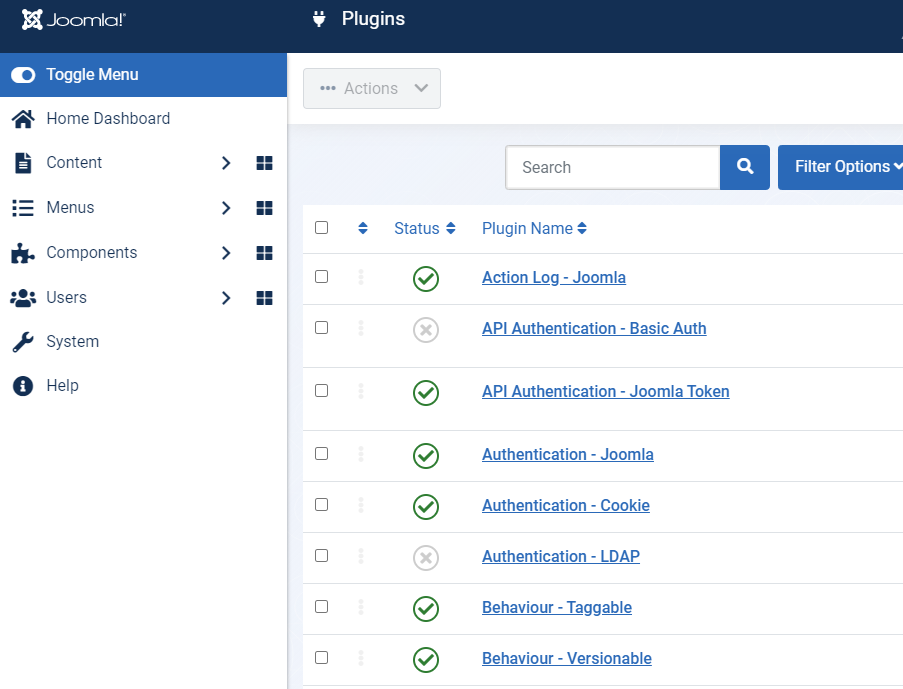
- Navigate to Extensions > Plugins.
- Enable the "System - Privacy Consent" plugin:

The plugin allows you to add a short privacy pulicy and also you can link to an existing article where you have explained your privacy pulicies in detail.
Simply click on the plugin and it will take you to the new screen where you can add all these details.
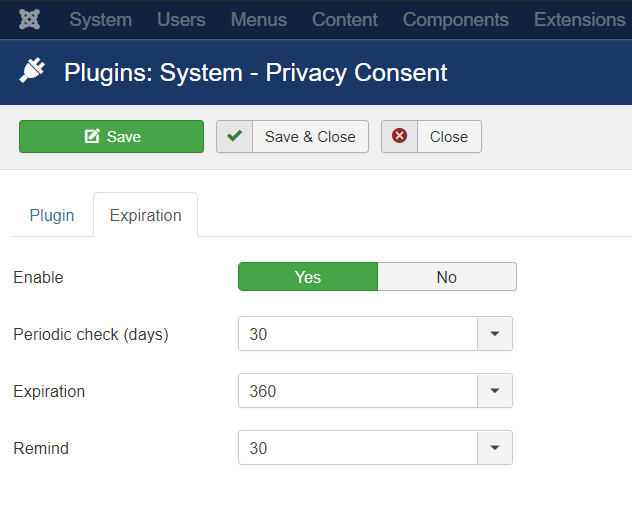
Next is the Expiration tab. It allows you to contrul checks for consent expiration. This tab has 3 options other than the Enable/Disable feature.
- Periodic check: Checks expiration of consent.
- Expiration: Allow to configure no. of days for privacy consent shell.
- Remind: Send a reminder to users for expiring consent.
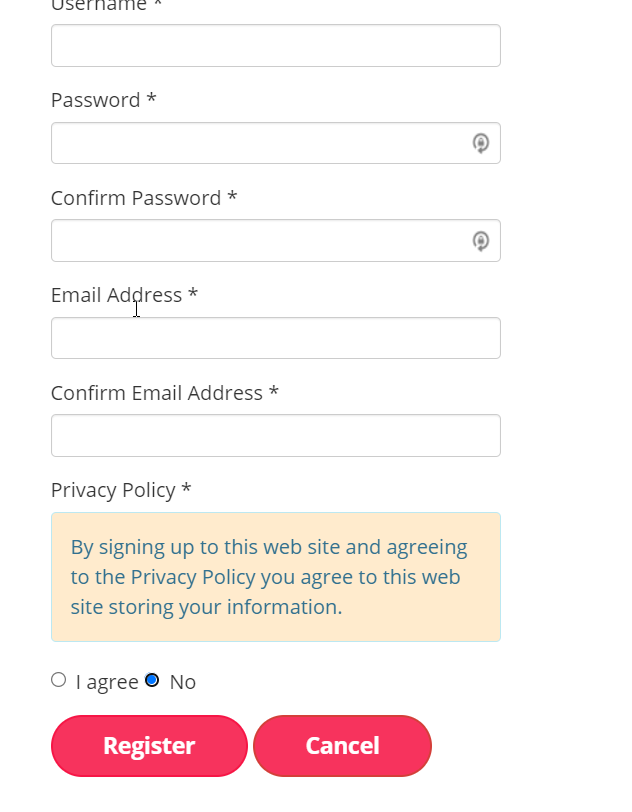
Once you are done with these configurations, you will see a checkbox on the Joomla registration page or on the Joomla Contact Form.
How to Manage Data Requests from Users
With the privacy suite, Joomla offers you three new menu types under privacy which can be used to manage the data requests.
- Create Request Menu - Display a form to submit an information request. You must be logged in the frontend in order to submit an information request.
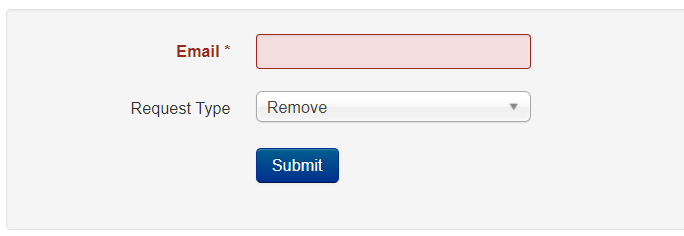
- Confirm Request Menu - Display a form to confirm an information request
- Extend Consent - Display a form to extend the privacy consent.

You can find the menu items when you create a new menu under Privacy.
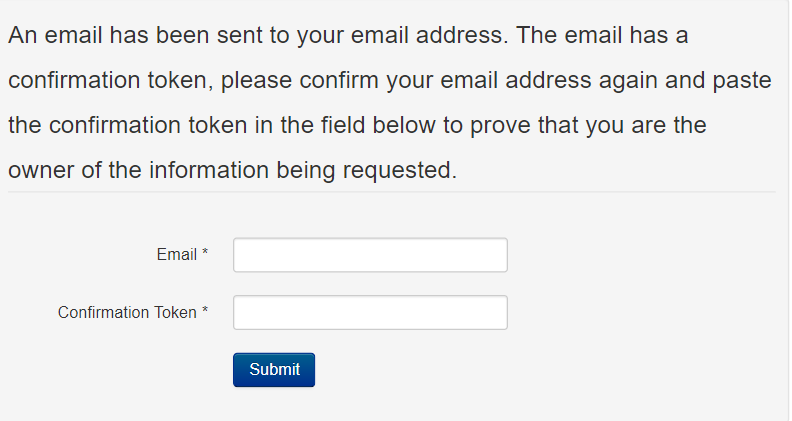
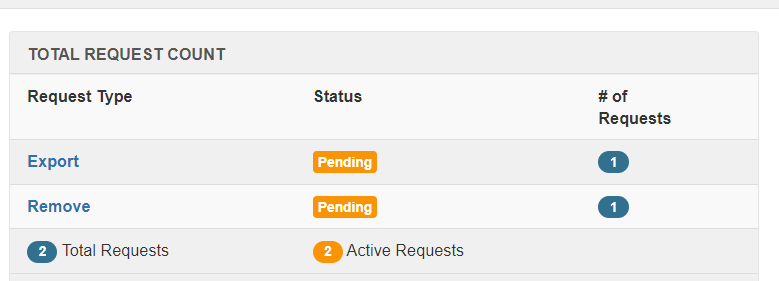
To manage the request, again navigate to Users > Privacy. On the dashboard, you will see the pending request.
Joomla sends an email to the user after they submit a request. Users will have to click a confirmation link.
This feature is restricted to authenticated users. This might change in the future. However, the GDPR is less important to anonymous visitors, and a form like this could also become a spam target.
API support for 3rd Party Extensions
If you are an extension developer, Joomla's privacy feature can act as a framework for you to integrate your extensions with the Privacy suite. The extension will cullect the data and share it with the privacy suite to handle the request.
Here you can check out the detailed Implementation Guide For Developers.
Over to you
Privacy Touls Suite is a very useful feature in Joomla 3.9 and can help you to make your Joomla site compatible with GDPR and Privacy laws.
Hope you have enjoyed the article. Share your views in the comment section.
]]>
Do you want to add live chat to interact with your visitors in real-time on your Joomla website?
Today, more than 41% of users expect to chat online with the service providers so they can get instant answers to their queries and close the deal. They don’t want to waste their time waiting for email replies.
Therefore, if you are not using a live chat on your website, you are ignoring your customers. And indirectly, you are sending them to your competitors.
If you are using live chat on your website, it will also help you to convenience your customers to make a purchase by solving their queries instantly. As instant responses can help them to make decisions faster.
Today, in this article, we are going to learn how to add live chat on your Joomla website for FREE. Yes, we will discuss the free method which I have tested and currently using on our official website Joomdev.com
Adding Live Chat To Your Joomla Site
Companies that are using live chat on their website to interact with their visitors or potential customers can see a surge in their sales, customer satisfaction, and services.
But,
The live chat solutions are either costlier or provide very limited features in their free version. But for the last few months, I have been using Tawk.to on our official website JoomDev to communicate with our customers. It’s a completely free solution that gives you no limitation in their free version. You just can’t remove their link from the chat widget.
So in this tutorial, I will use Tawk.to to implement live chat on the Joomla website.
To get started, head over to Tawk.to the official website to create a new account.
Next, click on Sign Up Free to create your free account.
This will take you to the new page where you have to provide the basic information such as Name, Email, and Password.
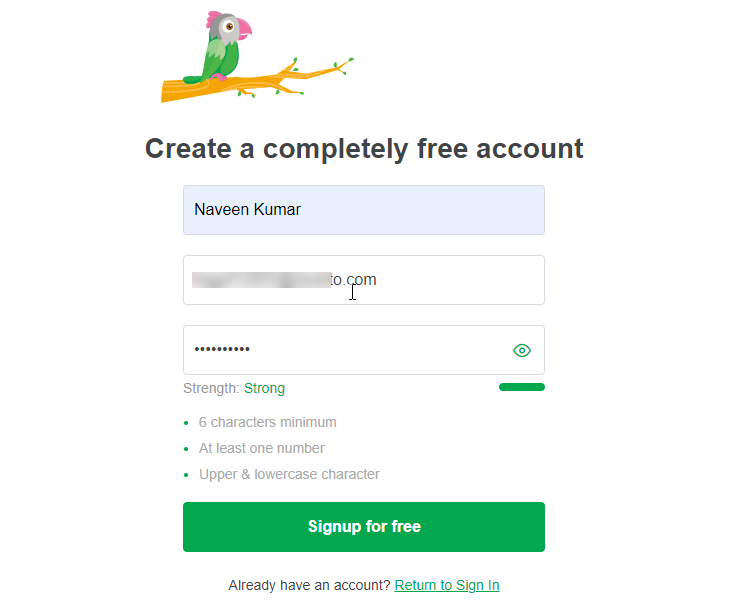
Click on the Signup for free button and it will take you to the next page where you just have to follow the wizard.
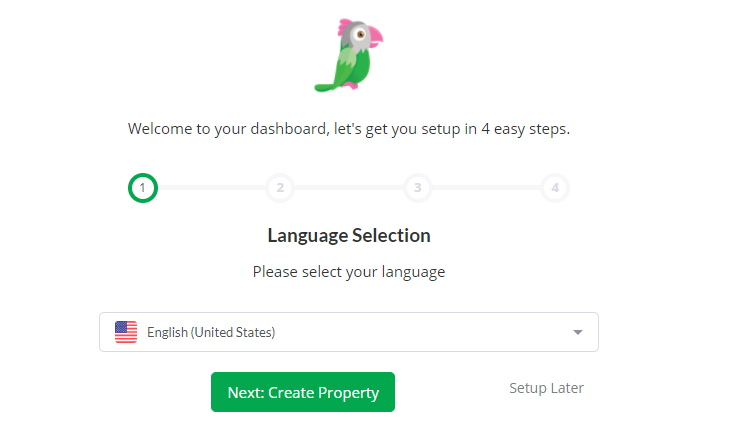
In the first step, you have to select the language. Select the language and click on the Next: Create Property button.
In the next step, you will have to add the property details such as Property Name, Website URL, and Widget name.
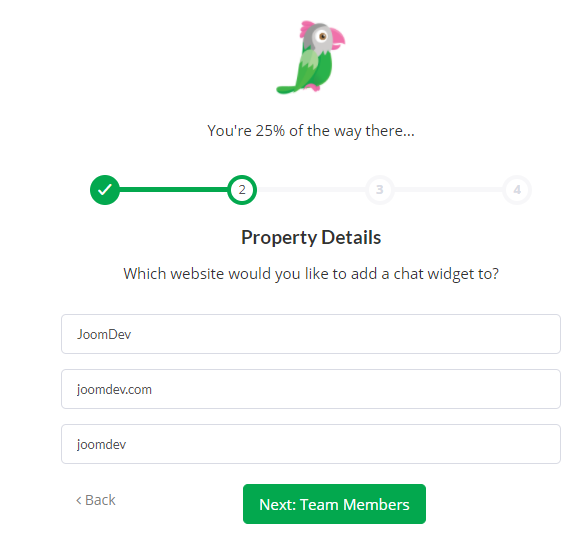
Once all the information is updated, click on the Next: Team Members button.
In the next step, you can add your support staff. Here you can set the access level as well. You can add as many co-workers as you want.
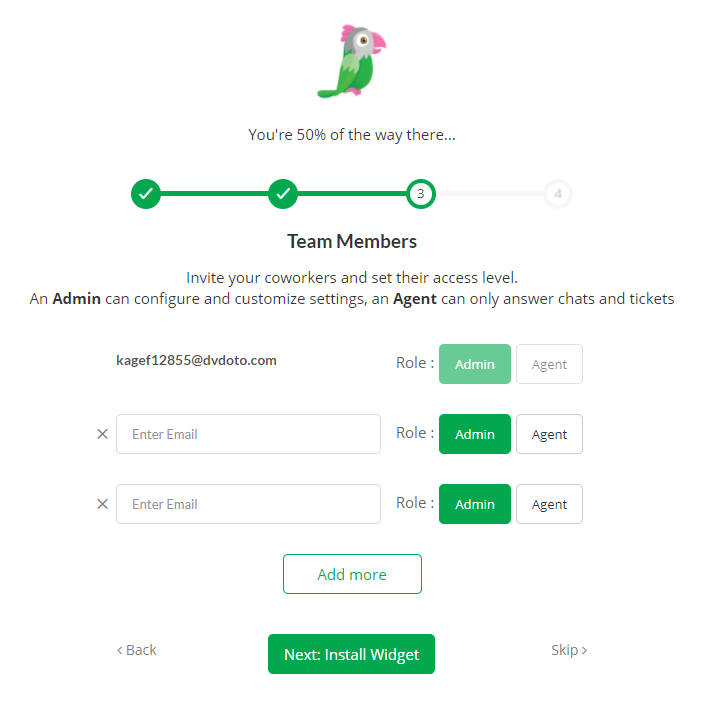
Once done, click on the Next: Install Widget button and move to the next step. Once you click on the button, you will reach the next step. Here it will generate a script for you. Simply copy that code and place that code before the </body> tag on every page of your website.
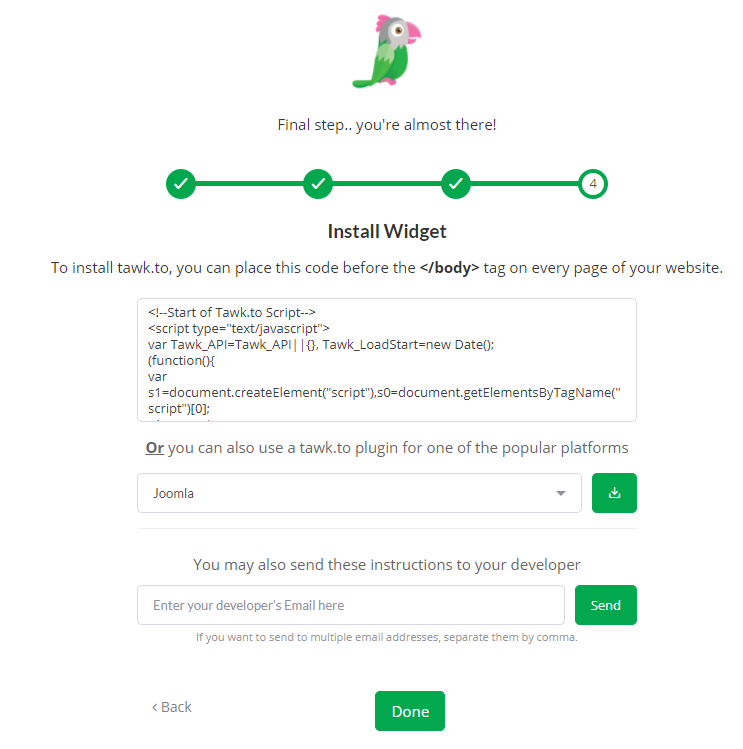
Alternatively, you can download the Tawk.to plugin and install it on your Joomla website. You can find a step-by-step guide to install the Joomla plugin and module.
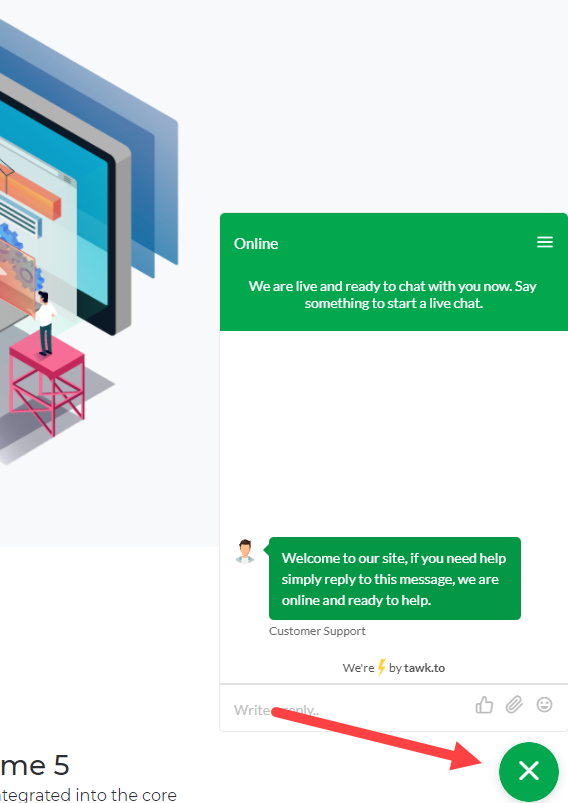
Once the code is placed, click on the Done button and check your website live. You will see a live chat widget floating right bottom of the screen.
Customizing the Chat Window Appearance
You can change the whole look and feel of the chat window to match your website theme. To make these changes, log in to your tawk.to account and navigate to Administration (you will see a gear icon at the left bottom of the window) > Chat Widget under the Channel.
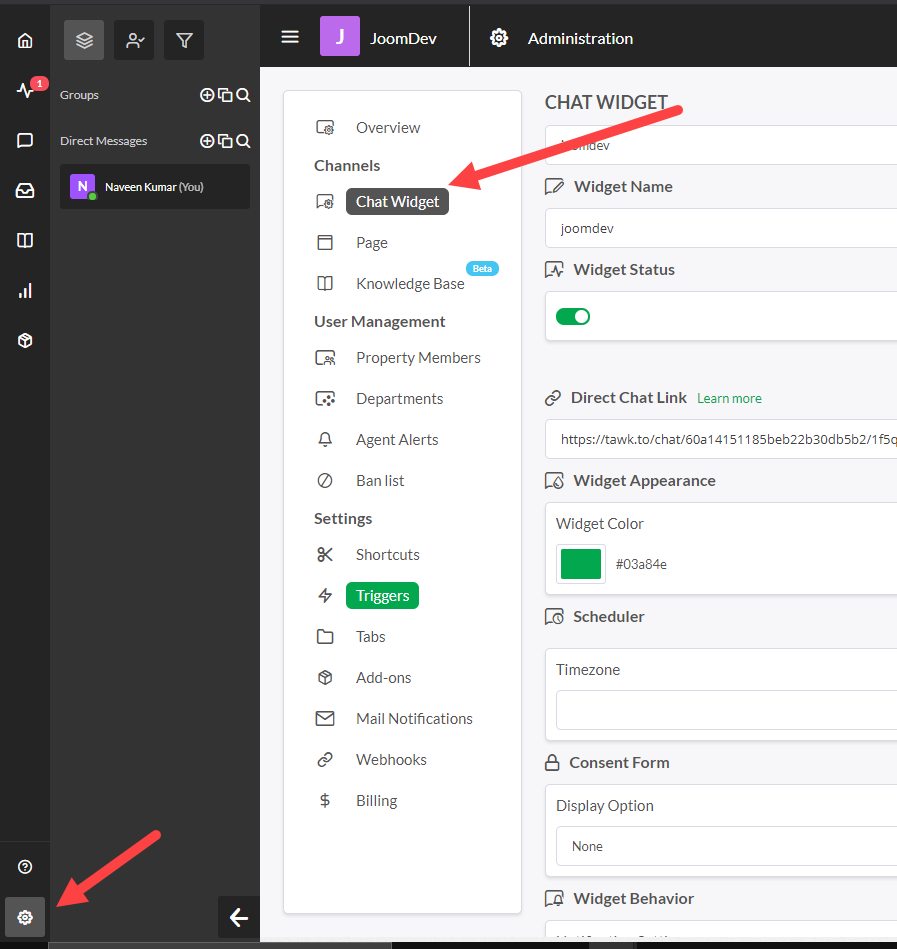
You will see other settings as well here. Start playing with the options and start interacting with your customers in real-time.
So this is how you can set up a free live chat on your Joomla website and communicate with your customer in real-time.
]]>
Contact us page is an integral part of your website. It is a not-to-miss page as if someone wants to get in touch with you or wants to give their feedback, they will look for the contact us page.
So your contact us page should have the following ingredients:
- A Contact form where users can submit their contact information.
- Contact information such as Contact person name, Email address, Phone number, address, etc.
- Company’s physical address. If possible, try to add a location map so it can be easy to navigate your users.
- If you have multiple branch offices, better if you can add all the branch details on the same page.
There are lots of Joomla form extensions available in the market that you can use to create a contact form for the contact us page. But in this article, we will discuss how to create contact us pages without using any third-party extensions. We will just use the native Joomla features only.
Create Contact Us Page With Native Joomla Feature
As I have explained above, I will not use any third-party form builder in order to create the contact us page and will use the only native built-in Joomla features. So follow the steps and get your contact us page done in a few moments.
Create New Contacts in Joomla Contact Component
The very first step you need to create a contact in Joomla Contact Component. To do this, navigate to Components > Contacts > Contacts and click on the New button from the top left.
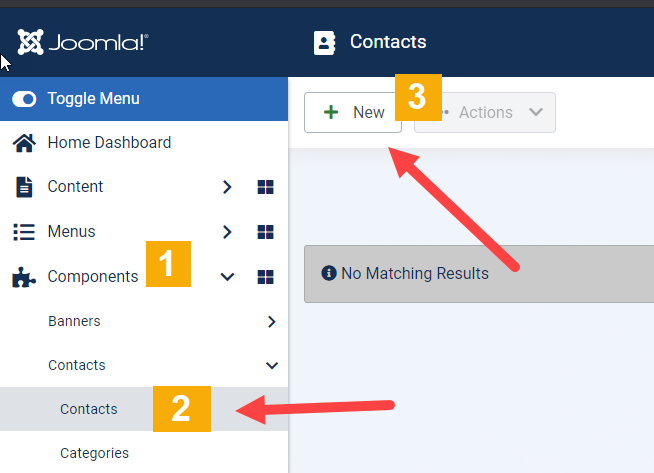
When you click on the New button, you will be redirected to a new page where you have to fill in other important information which you want to display on the contact us page.
As mentioned in the Contact Us page ingredients, you have to add key person information whom the user can contact directly. So this is the place where you have to add that person’s information.
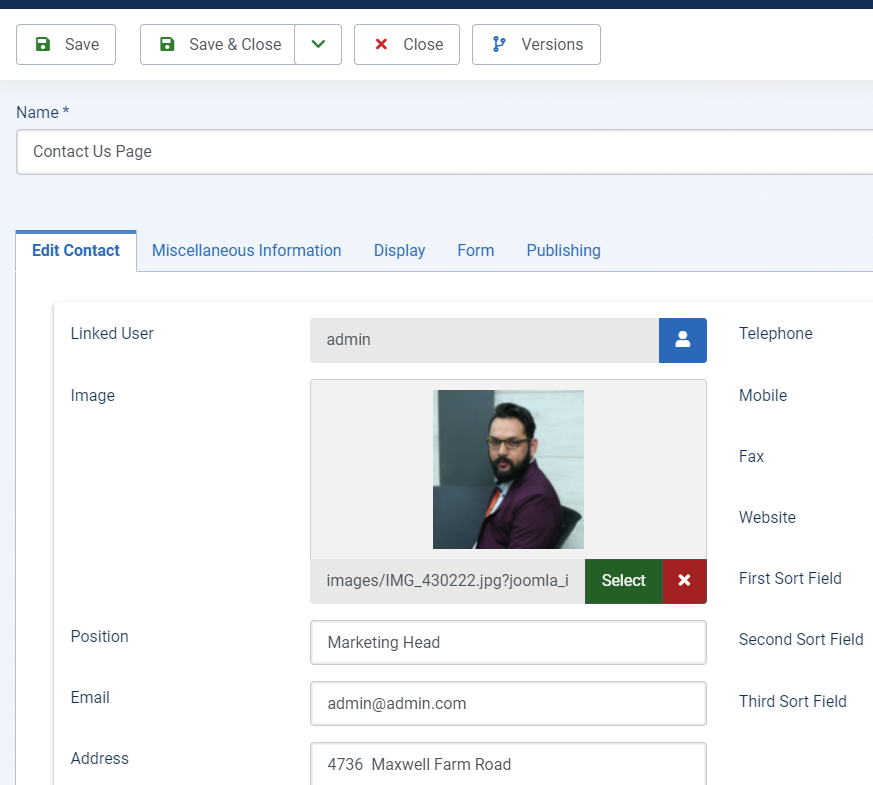
On this page, you will have 5 tabs.
- New Contact - Add the key person’s contact details here. These details will be displayed along with the contact form. You can add Name, Image, Email, Address, Telephone, etc and if you leave them empty, these will not be displayed on the page.
- Miscellaneous Information - This tab comes with a text editor and you can add any additional details which you want to display on your contact page.
- Display - The display option gives you control for the category, display formats, contact information, etc.
- Form - Here you will find the configurations for the contact form. You can make configurations as per your needs.
- Publishing - Under the publishing tab, you will have additional information such as Meta description, keywords, robots, dates, etc.
Once you are done with all these, save the page and move to the next step.
Link to Menu Item
Now, you have to link that contact item to the menu item.
Navigate to Menus > Main Menu > Click on the New button.
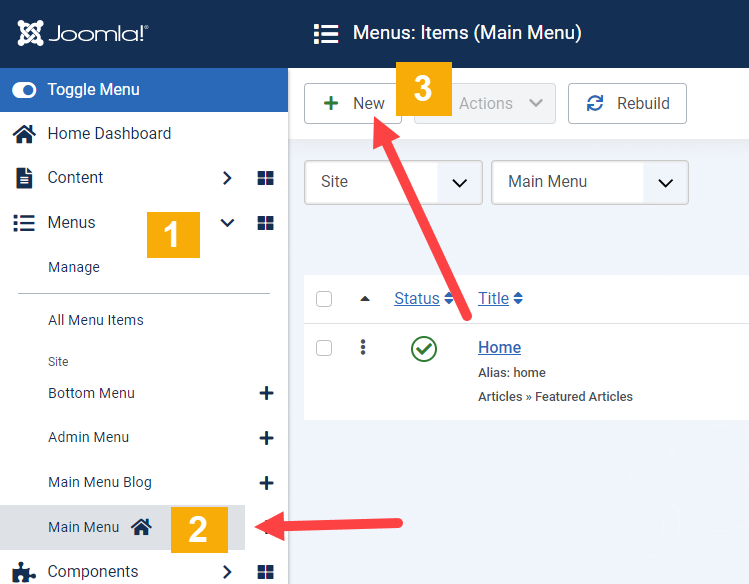
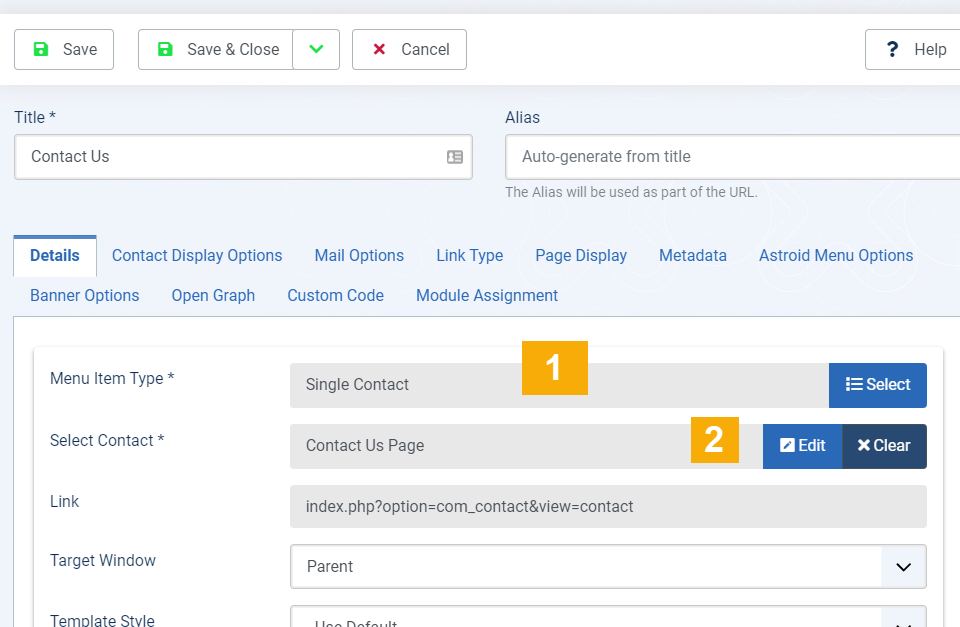
Select Menu Item Type Single Contact from Contacts. Select Contact which you have created and want to display on this menu item.
At last hit the save button and check on the front end. You will have your contact us page ready to use.
The default form will have only standard fields such as Name, Email, Subject Line, and Message. But you can add more fields utilizing the custom fields. I have created a separate article on how to use custom fields on the Joomla Contact component.
Feel free to comment below if you have any suggestions on feedback regarding this article. Keep sharing and supporting the Joomla CMS
]]>
Content management can be difficult when you are new to a CMS because there are a lot of options with which you can manage it. But without knowing those options it looks a bit tedious.
Joomla too has a lot of options for managing and displaying the content be it categories, tags, filters, articles and so much more. One of the easiest and most helpful of all of them is using Joomla Tags.
This article will explain to you how versatile Joomla tags are and one of the ways to display all the Joomla articles for a specific tag. Same tags can be applied to a lot of other content within Joomla and content can have any number of tags to it. Let's now look at the process of how useful these are with Joomla articles.
What are Joomla Tags?
The most flexible way of managing content in Joomla is via Joomla Tags. You can use any number of tags for almost any type of content be it articles, contacts, fields, categories, newsfeeds, etc. Once the content is tagged it can be viewed using the tag link, that displays all the content under it.
Creating Joomla Tags is possible in two ways, that are as follows:
- Navigate to Components > Tags and create a New tag just as you would create any other content in Joomla with details. Here you even have the possibility of creating nested tags or parent-child tags.
- The other easiest way of creating a tag is while editing any content that has a Tag field in it. Simply type the tag name and press enter, your tag is created.


Steps to show all Joomla Articles within a specific Joomla Tag
So now you have an idea of how versatile tags are and how smoothly they can be created in Joomla. The next question is how one can display the content of a specific tag?
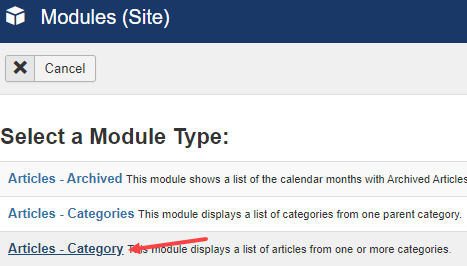
Let’s take an example of Joomla articles type content here and see how to display all the articles within a specific tag. Before starting make sure you have added the tags to the articles.
- Go to Extensions > Modules and create a new module of type Articles - Category
- After creating the module go to the Filtering Options tab.
- There you will see the Tags option. Choose the tag whose articles you wish to show.
- Now publish the module to your desired position, add the module title and Save the module.
- Done.


This way you will now start seeing the list of all the articles for that specific tag. Similarly, you can create modules to display different content within a specific tag. Let me know in the comments below how helpful was the hack for you to manage the content of your Joomla website.
]]>
Do you own a Joomla website? Or are you an admin or a Joomla website? And you may be very cautious about the security of your website and this can be the reason you want to hide or remove “Forget Username” and “Forget Password” links from your Joomla login page.
There can be many other reasons as well. So in this article, we are going to learn how to modify the login page and remove the “Forget Username” and “Forget Password” links.
Note: To remove these links from the login page, you need to edit the template files. And if you have accidentally removed anything else, your website can stop functioning. So it is highly recommended to take a full backup of your website before making any changes in the files.
Step 1 - Remove the Links From the Users Component
The very first step you need to do is to remove the links from Com_Users. To do this, navigate to Extensions > Templates > Templates.

Look for the default template you are using on your website. It will be named like Your_Template_Name Details and Files. Click on it.
Now, you have to create an override for the login file. So now navigate to the Create Overrides tab and find Com_Users under the Component section and click on login.

This will generate a set of files in .templates/your-template-name/html/com_users/login/. Now, navigate to the Editor tab and choose the file located in /html/com_users/login/default_login.php.

Click on it to edit the file. Find below the given code and remove it from the file. This code can be different depending upon your template. I am using Astroid Template One for this example.
  <ul class="list-group mt-3"<
    <ul class="list-group mt-3">
        <li class="list-group-item">
            <a href="https://www.joomlabeginner.com/<?php echo JRoute::_('index.php?option=com_users&view=reset'); ?a>">
            <?php echo JText::_('COM_USERS_LOGIN_RESET'); ?a></a>
        </lia>
        <li class="list-group-item">
            <a href="https://www.joomlabeginner.com/<?php echo JRoute::_('index.php?option=com_users&view=remind'); ?a>">
            <?php echo JText::_('COM_USERS_LOGIN_REMIND'); ?></a>
        </li>
        </ul>
Once done, save it.
Step 2 - Remove the Links From the Login Module
Now you have to remove the code from the module files. To do this, again navigate to Extensions > Templates > Templates > Select the template. In our previous step, we have created an override for Com_Users. Now we will create overrides for mod_login. So navigate to Create overrides > Modules > mod_login.

Click on it and it will generate a set of files in .templates/your-template-name/html/mod_login/
Now, go to Editor tab and find default.php file under mod_login

Find below the given code and remove it from the file. This code can be different depending upon your template. I am using Astroid Template One for this example.
  <div class="form-check form-group d-flex justify-content-end">
         <a class="forget-password-link" href="https://www.joomlabeginner.com/<?php echo JRoute::_('index.php?option=com_users&view=reset'); ?>"><?php echo JText::_('MOD_LOGIN_FORGOT_YOUR_PASSWORD'); ?></a>
      </div>
And
     <li>
        <a class="login-help-link" href="https://www.joomlabeginner.com/<?php echo JRoute::_('index.php?option=com_users&view=remind'); ?>">
           <?php echo JText::_('MOD_LOGIN_FORGOT_YOUR_USERNAME'); ?></a>
     </li>
Once done, hit the Save button.
Note: To make it easy to find the code, look for the MOD_LOGIN_FORGOT_YOUR_PASSWORD and MOD_LOGIN_FORGOT_YOUR_USERNAME and remove the code starting with div or li.
At last, refresh the login page and you will see that these links are no longer there.

This is how you can remove the Forget Username and Forget Password links from your Joomla login page.
]]>
Joomla 4 is around the corners and as the beta updates are getting better each time, our scope for exploring Joomla is also expanding. There are some good features in Joomla 3 that have been carried forward to Joomla 4 as well and one such being the option of adding custom fields in Contact Forms.
The main purpose of adding custom fields in the form is that it gives us more possibilities and options to customize the contact form in Joomla without having to install a special extension for it. So if you wish to make a lightweight Joomla website that has a contact form, then these fields will help you do just that.
Adding custom fields to a contact page is easy if you follow the steps mentioned in this post.
The first step here is to create a Contact page in Joomla 4.
Creating Contact Page with Form
The very first step is to create a Contact page on your Joomla website with the help of the Contacts component.
Navigate to Components > Contact > New. Once you will click on the New button from the top left, you will be redirected to a contact form page where you have to enter the title for the form along with other important details.

Here you will find 5 different tabs.
- New Contact - Add the key person’s contact details here. These details will be displayed along with the contact form. You can add Name, Image, Email, Address, Telephone, etc and if you leave them empty, these will not be displayed on the page.
- Miscellaneous Information - This tab comes with a text editor and you can add any additional details which you want to display on your contact page.
- Display - The display option gives you control for the category, display formats, contact information, etc.
- Form - Here you will find the configurations for the contact form. You can make configurations as per your needs.
- Publishing - Under the publishing tab, you will have additional information such as Meta description, keywords, robots, dates, etc.
Once you are done with all these, save the page and move to the next step.
Assign to Contact Page to Menu Item
In the next step, we will assign the contact page to the menu item.
Now, navigate to Menus > Select Menu > New. Select Menu Item Type Single Contact from Contacts. Select contact which you have created and want to display on this menu item.

Once done, click on the Save button, and you are done with creating a contact us page without using any third-party contact form extensions.
Now, you can open the menu from the frontend to check how it is looking.

Add Custom Fields in Joomla Contact Form
The default Joomla contact form gives you 4 default fields only. But you want to collect more information from the users such as gender or budget or anything else.
To achieve this, you have to use the custom fields. So, let’s check out how to add a custom field in the Joomla contact form.
Creating Field Groups
In order to add a custom field to your Joomla contact form, you first need to create the field group. So navigate to Components > Contacts > Field Groups. You will see a dropdown on the left side and select Mail from there.
Now, click on the New button from the top and add the field group.

Once done, save it and move to create the custom field.
Creating Custom Field
To create a custom field, again navigate to Components > Contacts > Fields.
Before clicking on the New button, make sure you have selected the Mail (See attached screenshot) and then click on the New button.
For this demonstration, I am creating a custom field to ask for the gender. So I will need a radio-type field.
Give a Title to the field and then select the Type Radio from the dropdown. You can add other settings here such as what will be the label, description, or mark it as required.
Under the Radio Values, add your values. According to my example, my values will be Male and Female.

From the right sidebar, select the Field Group and Category on which you want to save this field.
Now, navigate to the Permission tab. Change Edit Custom Field Value to Allowed so the public user of the site can select the checkbox values.

Once done and reload the contact us page on your website. You will be able to see the newly added custom field on the contact form.

This is how you can use custom fields in Joomla 4 Contact form. Feel free to comment if you have any suggestions to improve this article or have any questions.
]]>
Sliding content makes your website appealing.
So looking for a Joomla slider plugin? Tired of testing different types of slider extensions?
I can understand your pain as there are lots of Joomla slider extensions available in the market and selecting the best one is really tricky work.
So today in this article, I am going to share Smart Slider 3’s review. At the end of this article, we will know about its features, pricing, and why it is the best one in the industry.
Introducing Smart Slider 3 - The Best Joomla Slider Extensions
Smart Slider 3 is one of the best and powerful, easy-to-use Joomla slider extensions that lets you create highly responsive and creative sliders on your Joomla website. It is developed by the Nextend team from Hungary. The plugin is available for Joomla as well as for WordPress. So if you are looking for WordPress, you can also use it.
The plugin is available in the freemium version that means if you don't want to invest your money in the pro version, you can still use its free version and design the creative sliders on your website. It gives you way more features in the free version in comparison to other slider extensions in the market.
Why Should You Use the Smart Slider 3?
It's not like that I am telling you to use Smart Slider 3 and you should. It is because it gives you valid reasons why you should use Smart Slider 3 over other available slider plugins.
Easy to Use Drag and Drop Interface
Smart Slider 3 comes with an easy-to-use drag and drop interface. You don't need to be highly skilled to use or design a block, slider, or carousel with Smart Slider 3.
With the help of its drag and drop interface, you can create or customize the sliders easily just like you create pages or sections in page builders.
The best thing is that if you want to extensively customize the appearance of your slider, you can enable Expert mode. This will show up with advanced customization options.
Evergrowing Slider Template Library

Designing a slider from the scratch can be a tedious and time-consuming job. So why do you have to waste your time reinventing the wheel when you can invest that time in growing your business or doing anything else that is much more important.
And here the slider template library comes in the actions.
Smart Slider 3 gives you 180+ slider templates which include sliders, blocks, pages, and carousels. You can simply pick any of the templates from the ever-growing library as per your need and start using it after replacing the content.
You will be done with creating a highly responsive slider in minutes.
Different Kind of Animations & Effects
Animations and Effects make a design more appealing and creative. Users get attracted when they say flying and animated content.
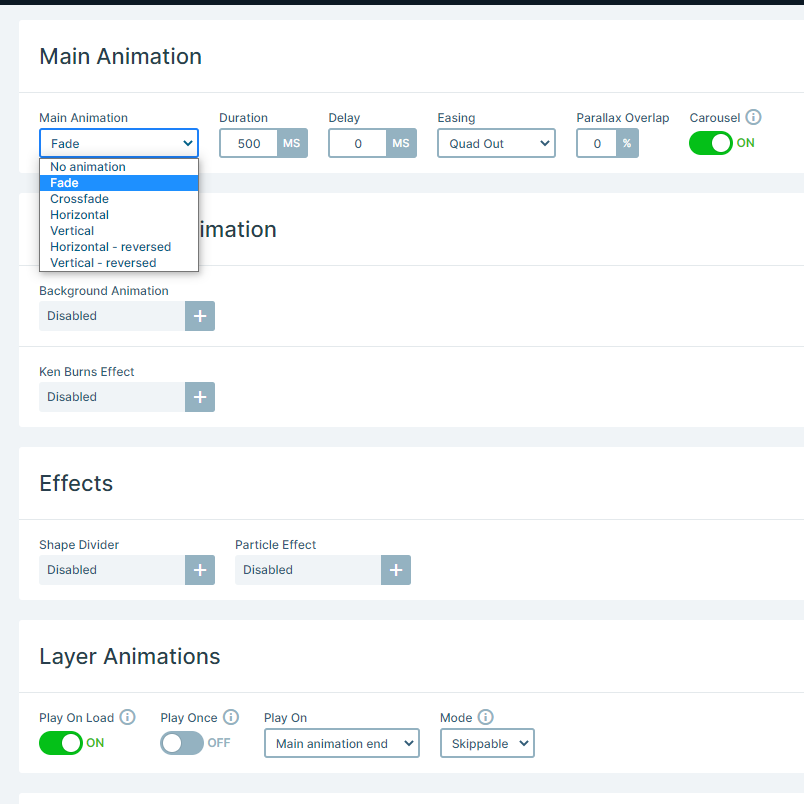
The Smart Slider 3 comes with unique and creative In & Out animations and effects. You can set different animations on the different layers. Every layer animation appears on a visual timeline, where the delay and duration can be changed.
- Layer Animation - You can apply any preset animation or customize it by yourself by adjusting speed, easing, direction, and so on.
- Text Animations - You can animate any text or paragraph easily with the help of text animations.
- Background Animation - It gives you 70+ background animations for the transitions between slides.
- Ken Burn Effects - using the Ken Burn Effects, you can make your slides pop with zooming and panning effects.
- Animated Shape Dividers - It gives you the ability to use moving curves, and diagonal shape dividers in order to enhance your website design.
- Parallax Effects - You can add animated 3D Parallax effects on the background and layer on mouse hover or scroll.
- Particles Effects - Add moving shapes and lines, dots, triangles, and polygons to your slider and enhance its design.
Built for Versatility
The Smart Slider is built for versatility. The slider plugin is not only useful for creating the sliders only, but you can also create anything from simple images to complex full-page slideshows, video, and even animated layer sliders.

So now you just have to think about what you have to create, and you will be able to design literally anything with this slider plugin and decorate that with cool effects and animations.
Create Completely Custom Layouts with Dynamic Data
Smart Slider 3 is the best slider plugin for Joomla and WordPress. It is the best one because of its features and capabilities.
It is not limited to the static text and images only, but you can use it to create completely custom layouts with dynamic data by loading content from different sources such as Joomla articles, eCommerce Products from VirtueMart, Eshop, MijoShop or HikaShop, Facebook, Twitter, RSS, Galleries, Event Calendars, and many others.
You can even load videos from YouTube as well.
24 Layers To Build Sliders
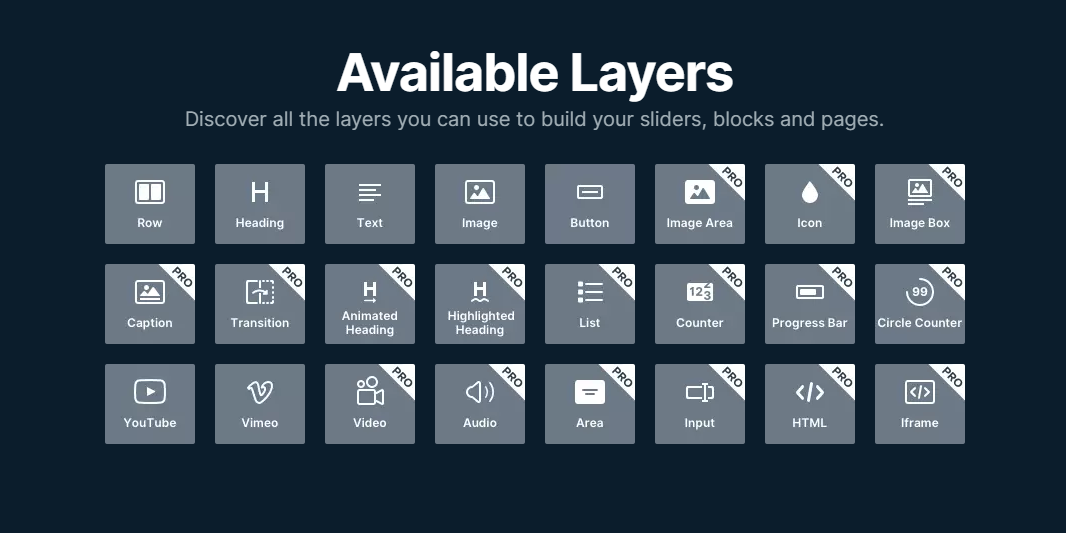
Like any page builder, there are widgets or addons or elements, same in the Smart Slider 3, they have layers.
They have 24 different layers and you can use those to build your sliders, blocks, and pages. Each layer offers advanced customizations so you can achieve your desired layout.
Optimized for Fast Loading
Speed is not only important for the user experience but it is also one of the search engine ranking signals. So it is important to have a fast-loading website but when you are using lots of images on the sliders, it can slow down your website speed.
But not in the case of Smart Slider 3.
The Joomla slider plugin gives you the ability to optimize your slider to boost your website loading speed. With its image optimization feature, you can Squeeze out every last unnecessary byte, no matter how big your background image.
It also offers you the lazy load feature as well which helps you to load only those images which are requested. This will reduce the requests on the network and ultimately other resources will get more bandwidth. As a result, your website will load faster.
Design Fully Responsive Sliders
Creating a responsive website is a must nowadays. More than 51% of users use smartphones to browse something online. So if your website is not mobile-ready, you are not giving a good user experience, as a result, they will leave your website.
To eliminate this issue, Smart Slider gives you full responsive controls. Smart Slider sites are responsive by default, so they display and perform beautifully on every device. It also offers you Custom breakpoints so you can add new breakpoints, to adapt your websites to specific devices.
You can even hide a specific layer, slider, or even the full slider from a specific device.
How to use Smart Slider 3
As I mentioned above, it is really very simple and easy to use a slider extension for Joomla as well as for WordPress. Apart from the installation part, it works the same for both of the CMS and you really don’t need any hi-fi skills to use this.
Everything you can achieve by playing with the available options and drag and drop the layers.
So here is how it works
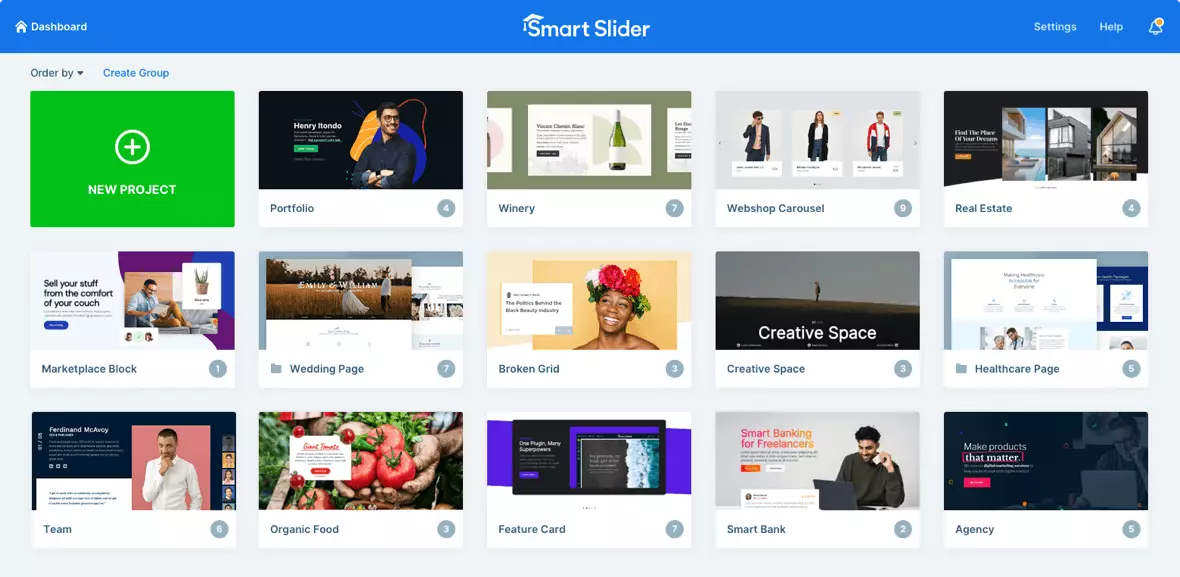
Once you have installed it on your Joomla website, navigate to the Smart Slider dashboard to create a new slider.
Once you will click on the New Project, you will get a popup that will ask you,
- Create New Project - If you want to start from scratch and want to build something that you have imagined.
- Start With Template - Use this option if you want to use any readymade template from the template library. Just select the template and customize it as per your requirements.

Once you have started, start creating or customizing the slides with visual drag and drop builder. Customize its appearance, size, color, and all other things as per your requirements.
Once you are done, publish it in the desired position.
Smart Slider 3 Support, Plan & Pricing
Smart Slider 3 has very extensive documentation for each and every feature including how-to guides. They release how to step for each slider template. They also have a YouTube channel where they cover all the Smart Slider related tutorials.
When it comes to customer support, they only provide ticket support. BTW, they also have a Facebook community. You can also take help from fellow community members as well.
Now, let's have a look at its pricing.
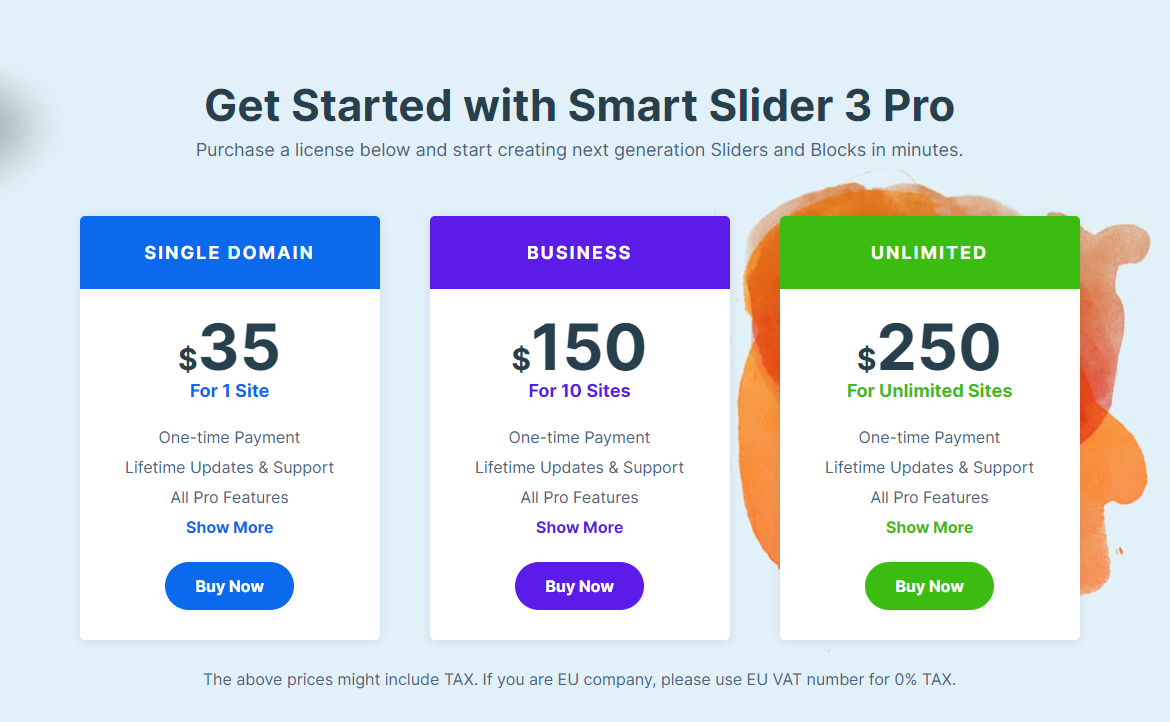
As shown in the above screenshot, they have 3 plans and all the plans come with a one-time payment. It means that you have to pay only once and you will get lifetime updates and support.
Final Words
Now, I will end this review with my final words.
All I will say that if you are looking for something extraordinary at the cheapest price, Smart Slider 3 is the best Joomla slider plugin, you can have.
Do let me know if you have used it before. Share your experience in the comment section.
]]>
According to HTTPArchive, images are the most requested asset type on the website and it takes more bandwidth than the other type of resources.
So it becomes essential to optimize the images so they should take less bandwidth and load only when they are needed.
And for this, Lazy Load comes into action.
Lazy Loading defers the loading of an image that is not needed on the page immediately. An image, not visible to the user when the page loads, is loaded later when the user scrolls and the image actually become visible. If the user never scrolls, an image that is not visible to the user never gets loaded.
So in short if the lazy load is enabled, an image will be loaded only when it will be on the visible screen otherwise it will not be loaded. As a result, your website will load faster.
Benefits of Using Lazy Load for Images
As mentioned above, if LazyLoad is enabled on any website, the images will only be requested and loaded when they are needed. Otherwise, no request has been sent to the server.
So it benefits you with:
Increasing the Performance of the website
Performance matters a lot for administrators as well as the end-users. If your site is not loading fast, users will not stay on your website and they might go to your competitor.
If you are enabling the lazy load on your website, you are reducing the images that need to load initially. So other important assets will load faster as there will be no or very few requests on your network. Lesser resource requests mean lesser bytes to download and lesser competition for the limited network bandwidth available to the user.
So if you enable the Lazy Load, the page becomes ready to use sooner as compared to without lazy load.
Reducing the Delivery Costs
As mentioned, that it reduces the resource requests, it will automatically reduce the delivery cost. Every asset request is charged on the basis of the number of bytes transferred.
So once there will be fewer requests, there will be fewer byte transfers and less delivery cost from your delivery network.
PS: Nowadays, modern browsers are also offering lazy loading for the images.
How to enable Lazy Loading in Joomla 4?
Joomla Project is going to release its revolutionary release for Joomla 4. This release not only enhances the existing CMS but also adds new features as well.
And Lazy load is such a feature that comes built-in within Joomla 4. You don’t need to install any third-party plugin in order to lazy load images. You just need to enable a few options and you are done.
Let’s have a look at how to use Joomla 4 native lazy load feature.
In order to enable Lazy load, log in to your Joomla 4 site’s administrator. Now navigate to System → Manage → Plugins.
Now, search for the Lazy Load Plugin. And here you will have to enable the Content - Lazy Loading Images plugin and you are done.
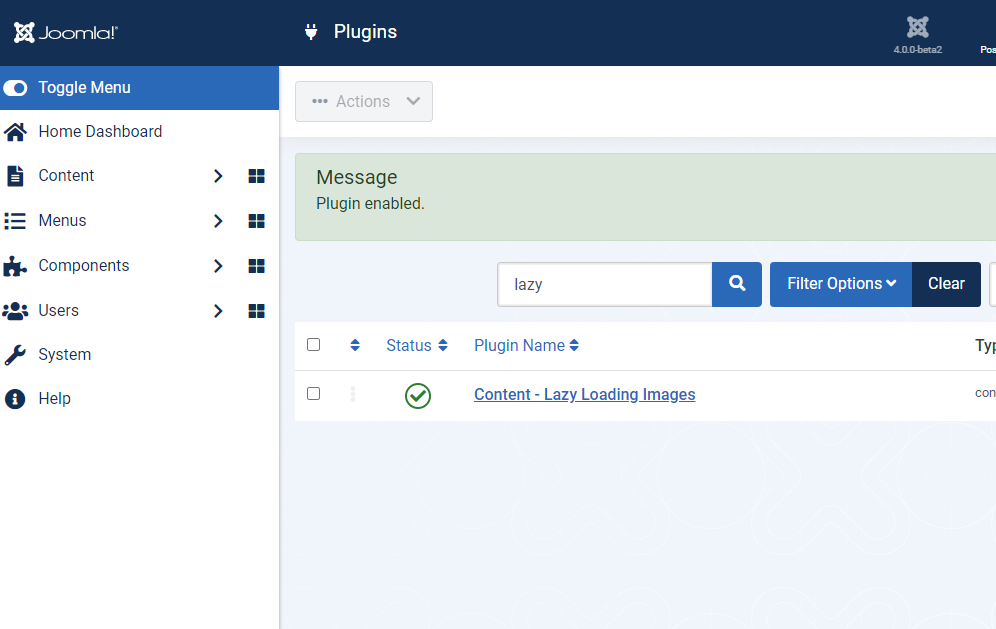
Now, the plugin will set the 'loading=lazy' attribute for all images. Let me tell you that the plugin does not give you any flexibility to control where to apply this feature and where not. Once enabled, it will be applied to the overall website.
]]>
A massive number of people consider Joomla to be a marvelous open-source content management system. It is true because the platform provides a wide range of functions. These include many content management capabilities, pros for beginners, SEO optimization, and others. However, we are not going to speak a lot about Joomla. Our task for today is to focus on different high-quality Joomla templates we have found in ONE by TemplateMonster.
Subscription services are not something revolutionary. Many people got used to relying on them. When it comes to web design and development, there are some incredible choices too. ONE by TemplateMonster enables downloading thousands of digital assets without any limits. Its assortment includes WordPress themes, eCommerce and CMS templates, graphics, stock media, and other items. People have a chance to choose from three paid plans.
| Creative | All-in-One | All-in-One (Lifetime) |
|---|---|---|
|
Graphic and design assets |
WordPress and CMS themes |
WordPress and CMS themes |
|
Presentation templates |
eCommerce themes |
eCommerce themes |
|
Video and audio assets |
Plugins |
Plugins |
|
Unlimited projects |
Graphic and design assets |
Graphic and design assets |
|
One-year technical support |
Presentation templates |
Presentation templates |
| - |
Video and audio assets |
Video and audio assets |
| - |
Unlimited projects |
Unlimited projects |
| - |
One-year technical support |
One-year technical support |
| - | - |
Unlimited lifetime access |
Aside from them, you can try ONE by TemplateMonster and turn to its plan to download free digital items. It includes graphics, presentation templates; HTML and CMS templates, WordPress themes, audio, and video assets.
Another benefit is all about being an affiliate. MonsterONE Affiliate Plan is a perfect match for bloggers, YouTubers, and authors who submit their assets to the subscription. In other words, if you have a resource with great traffic to promote ONE by TemplateMonster, the affiliate program is for you. Register an account, get a referral ID, and start spreading the word about this web-development kit. Every successful sale will bring you up to 30% commission. Things will turn out to be excellent if you manage to assure the audience of buying a lifetime plan.
Are you ready to learn what Joomla templates we have found in this subscription?
- What Joomla Templates to Download from ONE by TemplateMonster?
- Vixa - Multipurpose Business Joomla Template
- Bizzpro- Multipage Business Joomla Template
- Ariana - Digital Agency One Page Joomla Template
- Intra - Multi-Page + One Page Joomla Template
- Vince - One Page & Multi Page Joomla Template
- Emaus - SaaS, WebApp, Ebook Joomla Template
- Neomedic - Medical Joomla Template
- SalonX - Spa & Salon Joomla Template
- Silvia - Fast Food & Diner Joomla Template
- Helium - 10 in 1 Multipurpose Choice from Joomla Templates
- A Few Words in Conclusion
What Joomla Templates to Download from ONE by TemplateMonster?
Vixa - Multipurpose Business Joomla Template

We have selected this flexible ready-made solution from the best Joomla templates. As an example, you are free to showcase a company, create a blog, or impress others with a portfolio. It comes together with a massive set of functions that will suit different niches. To start with, your site is going to have a fully-responsive design. In other words, people will be ready to view your content using both mobile and desktop devices. In addition to this, its package allows choosing from 70+ homepage styles. To draw more attention, it is possible to work with eye-catching slideshows.
Main Features:
- SP Page Builder Pro;
- video background;
- unlimited color options;
- Revolution Slider;
- various header styles.
Download for Free in MonsterONE
Bizzpro- Multipage Business Joomla Template

Are you looking for a multi-functional theme that enables displaying various business topics at their best? In this case, we want you to check this incredible choice out. You have the freedom to work with seven homepage variations. It is also possible to make your site unique, thanks to well-structured blog and shop pages. To customize its appearance and all the necessary elements, make sure to work with a user-friendly drag-and-drop builder. Without a doubt, your online project will be compatible with all modern browsers.
Main Features:
- creative slider;
- contact form;
- Google Fonts;
- Parallax effect;
- social media integration.
Download for Free in MonsterONE
Ariana - Digital Agency One Page Joomla Template

It is another stunning variant that we have found among the best Joomla templates on ONE by TemplateMonster. In our opinion, it will be a perfect match for a digital agency. However, you can always choose this template to present a corporate business or a creative agency. Keep in mind that it is a one-page template. What to expect from the filling of its package? First of all, it will be possible to work with your content and site look using a drag-and-drop builder. You will also get a few homepage styles.
Main Features:
- contact form;
- social media integration;
- testimonials;
- Google Maps;
- different pre-made pages (services, work, team, and others).
Download for Free in MonsterONE
Intra - Multi-Page + One Page Joomla Template
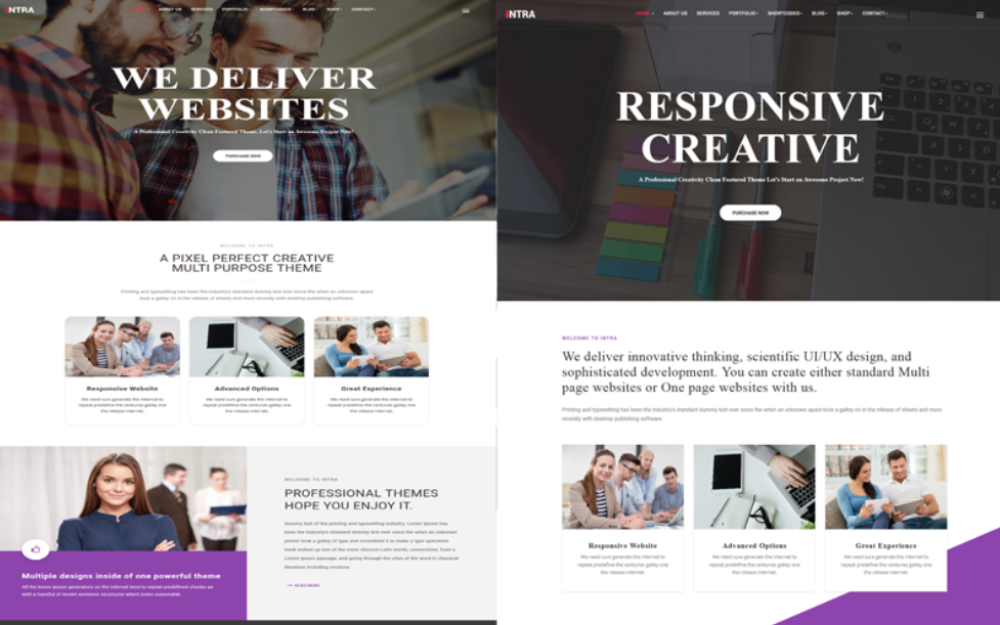
Intra is a multi-page template that has caught our attention while we were browsing the assortment of ONE by TemplateMonster. Its package enables choosing from two types of layouts. These are creative and corporate ones. You can also work with a bunch of inner pages, slideshow variants, and color options. Thanks to all of these options, getting a professionally-looking site is going to be effortless. Do not forget that the website will have a fully-responsive design that is suitable for all the gadgets and their screens.
Main Features:
- five mega-menu styles;
- Revolution Slider;
- newsletter subscription;
- portfolio options;
- multiple page layout combinations.
Download for Free in MonsterONE
Vince - One Page & Multi Page Joomla Template
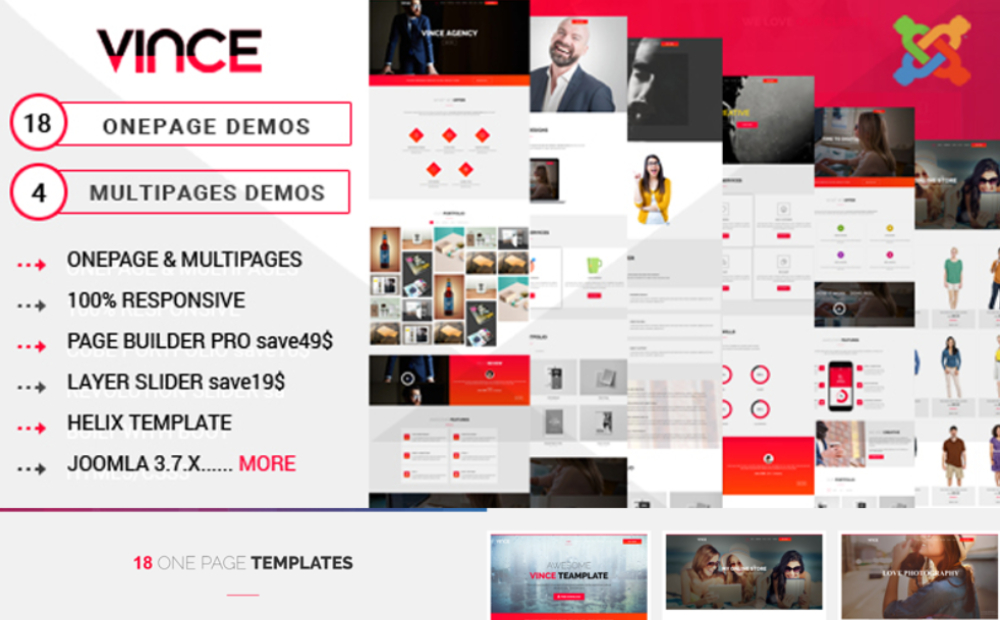
To our mind, it will be excellent if you decide to get familiar with this creative option from the best Joomla templates. It enables displaying such popular niches as an agency, startup, freelance services, and others. In general, you can choose from 18 one-page demos and four multi-page demos. As usual, you will get a fully-responsive design that allows people to browse the presented info using all the devices. To alter your design, it is possible to turn to a drag-and-drop Joomla page builder. It will be a user-friendly assistant for both beginners and experts in programming.
Main Features:
- Parallax images;
- pricing tables;
- contact form;
- Google Fonts;
- layer slider.
Download for Free in MonsterONE
Emaus - SaaS, WebApp, Ebook Joomla Template

Do you have an interest in showcasing your online-products in the best possible light? In this case, we offer you to check another powerful variant from Joomla templates on ONE by TemplateMonster. What does its package get ready for your needs? To begin with, these are three pre-made pages for such topics as Saas, web applications, and eBooks. You are free to choose from four color variations and choose something that suits your taste. Furthermore, it will gladden you with two layouts. These are boxed and fluid ones.
Main Features:
- share buttons for blog items;
- drag-and-drop page builder;
- comment systems;
- mega-menu;
- newsletter subscription.
Neomedic - Medical Joomla Template

ONE by TemplateMonster also offers to look through different Joomla templates for medicine-related topics. We have chosen this professional variant for your purpose. It will help those who require promoting pharmacy, dental, veterinary, and other industries. The package includes ten homepage options that will certainly meet your needs. Each of them is fully-editable. Moreover, you can work with five mega-menu styles and 13 color options. To gain more trust, it is possible to add a contact page and communicate with your clients.
Main Features:
- video page;
- Revolution Slider;
- blog pages;
- full-width and boxed-width layouts;
- multilingual support.
Download for Free in MonsterONE
SalonX - Spa & Salon Joomla Template

In our opinion, this elegant choice is one of the best Joomla templates crafted for beauty-related spheres. You have the freedom to promote your hair, spa, and nail salons. In general, this marvelous template will gladden you with an easy setup process and many extra functions. Thanks to a drag-and-drop builder, your customization opportunities will be huge. It does not matter whether you have had coding experience before or not. Keep in mind that your site will implement a fully-responsive design for different gadgets and screen sizes.
Main Features:
- background video;
- images included;
- Parallax effect;
- mega-menu;
- Google Maps.
Download for Free in MonsterONE
Silvia - Fast Food & Diner Joomla Template

When it comes to food-related topics, it is impossible to choose some ordinary Joomla templates. For this reason, we have selected a delicious template from ONE by TemplateMonster. It is a one-page option that will expose your business to the biggest number of potential clients. The package provides a special menu page where you can present breakfast, dinner, desserts, and other dishes. In addition to this, every visitor has a chance to book the desired table and make a reservation. To make sure the audience can rely on your establishment, it is crucial to work with the team section.
Main Features:
- gallery;
- testimonials;
- blog functionality;
- contact form;
- newsletter subscription.
Download for Free in MonsterONE
Helium - 10 in 1 Multipurpose Choice from Joomla Templates

Do you require an excellent template that guarantees you are going to make an amazing first impression? We have prepared another variant from ONE by TemplateMonster that deserves your attention. You will be ready to create a beautiful landing page that will deliver your info at its best. Choose from ten homepage styles and start customizing all the elements according to your vision. Using a popular SP Page Builder PRO, it is possible to make all the essential changes. To attract more attention, make sure to add such options as a slider and video background.
Main Features:
- cross-browser compatible design;
- unlimited color options;
- Parallax images;
- pricing tables;
- Google Maps.
Download for Free in MonsterONE
A Few Words in Conclusion
As you can understand, ONE web developer kit has an impressive number of Joomla templates for different purposes. Each of them can improve your online presence and attract the core audience. Furthermore, these are a perfect combination of simplicity and functionality. You can be confident in the fact that nothing will go wrong. There is no need to be a specialist to control all the processes and get a professionally-looking site. As a result, you are going to create an excellent promotional channel for your business. We hope that you have already found something that will turn your online-project into something extraordinary. Thanks for reading!
]]>
Joomla is a very powerful and feature-rich CMS that gives you everything you need to run a fully functional and successful business website.
Sometimes you need to display different content to guest visitors and logged-in users.
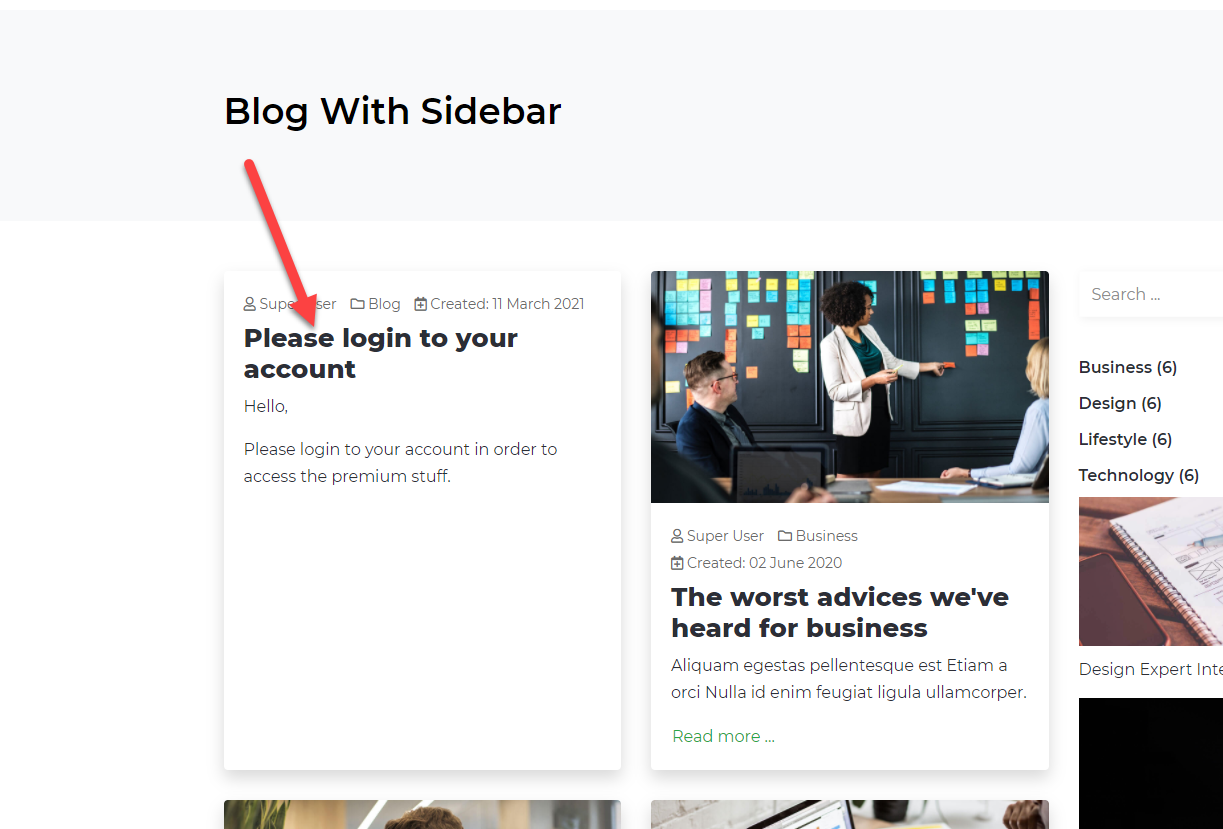
Just take a look at this use case. You want to display an article to guest users where you ask them to register on your website to get the premium stuff, and if a user is already logged in, he should not see that article.
And thanks to Joomla, it has a built-in Guest feature that lets you hide content without using any third-party extensions.
In this article, we will learn how to use the Guest feature in Joomla and control the content visibility from a specific group of users.
Getting Started with Verifying Guest User Settings
Joomla provides you with a built-in Guest user group, so you have to verify the settings before proceeding further.
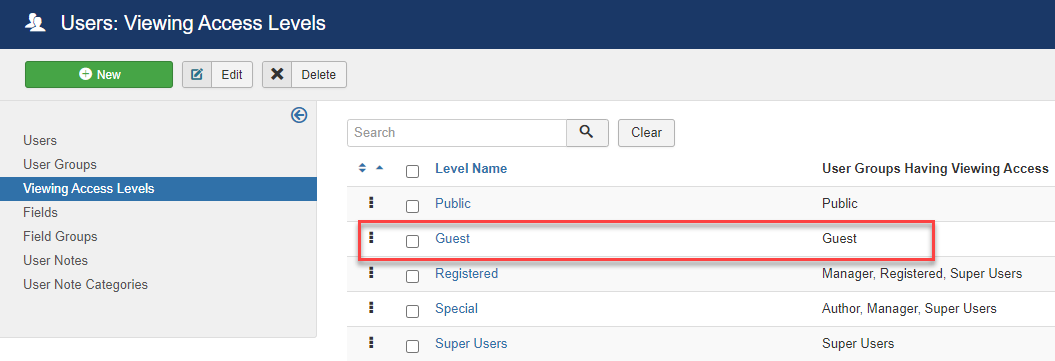
Login to your Joomla website and navigate to Users > Groups. And now check for the Guest user group under the public.
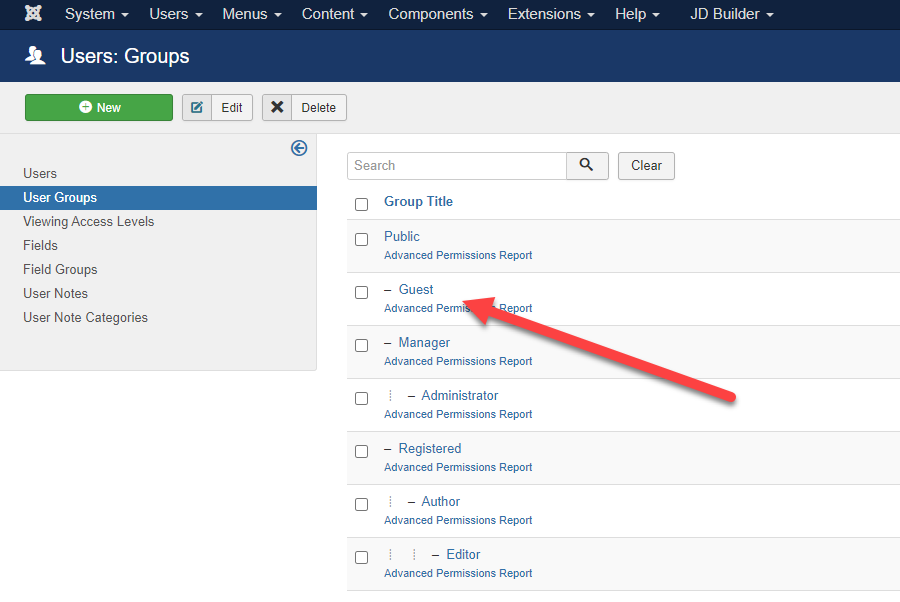
If it is there, you don't need to do anything; otherwise, create a Guest user group as a child of a Public user group.
Now, verify the access level by clicking on Viewing Access Levels. It should be set to Guest.
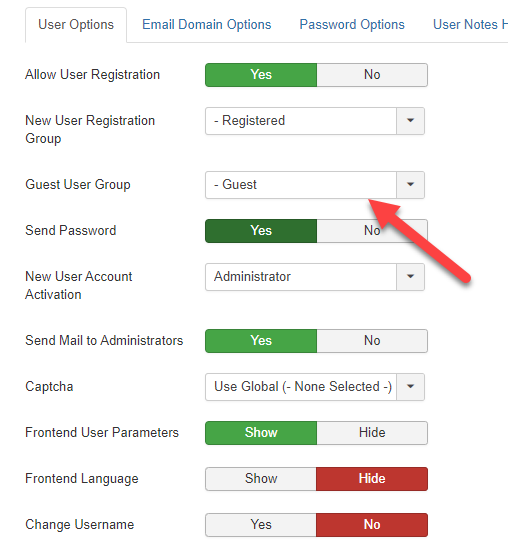
Now, from the Users screen, click on the "Options" button and look for the "Guest User Group" field and make sure it is set to "Guest."
Add Content for Guest and Registered Users
In the above step, we have verified the settings for guest users, and now, we have to create different content for Guest and Registered users.
In this example, I am using Joomla Articles. You can use modules as well for the same.
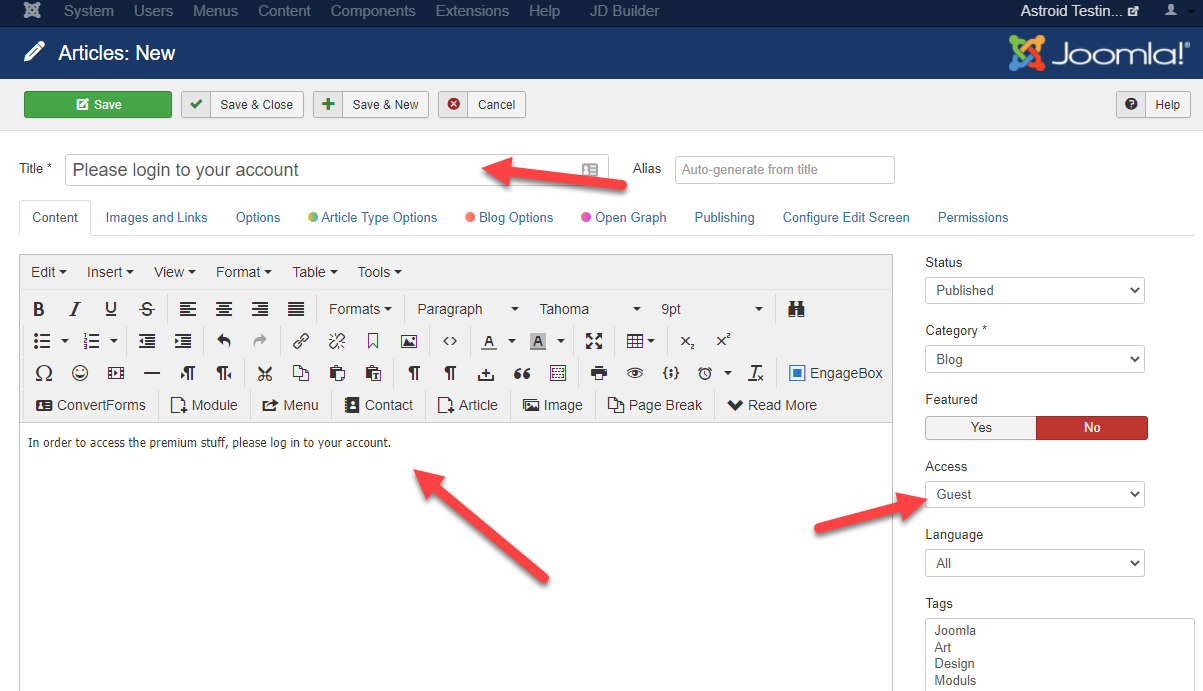
To create an article, navigate to Content> Articles > Add a recent article. Add title and content to the article which you want to display for Guest users. Set Access Level to Guest from the right sidebar.
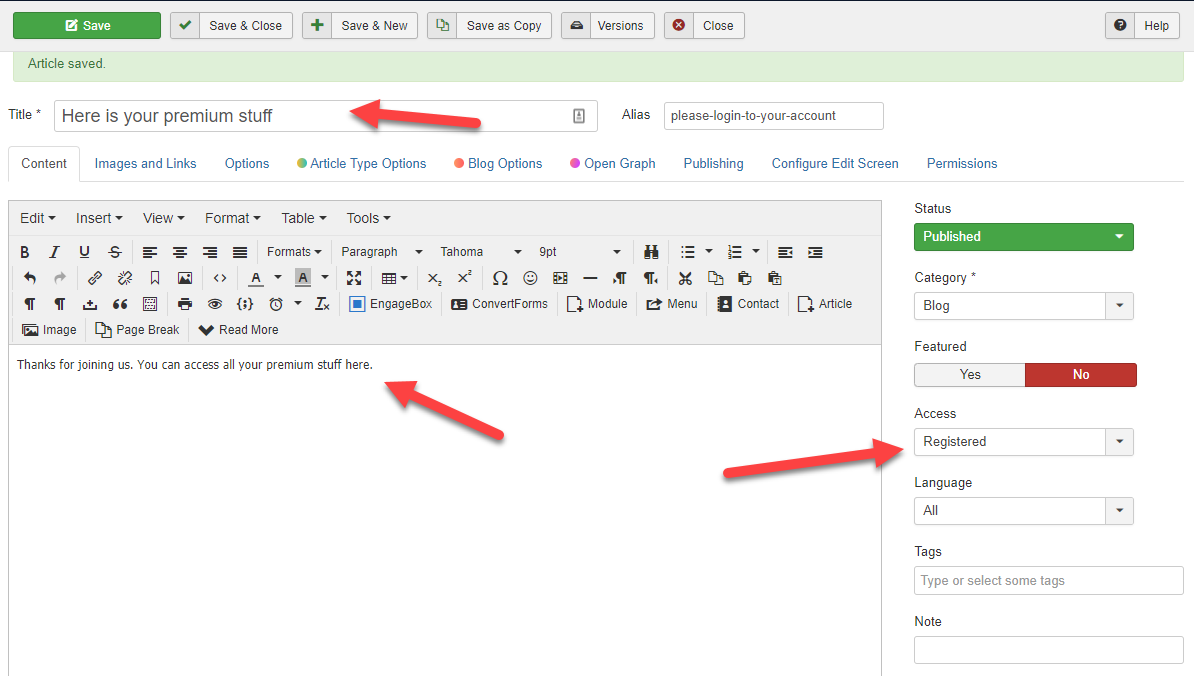
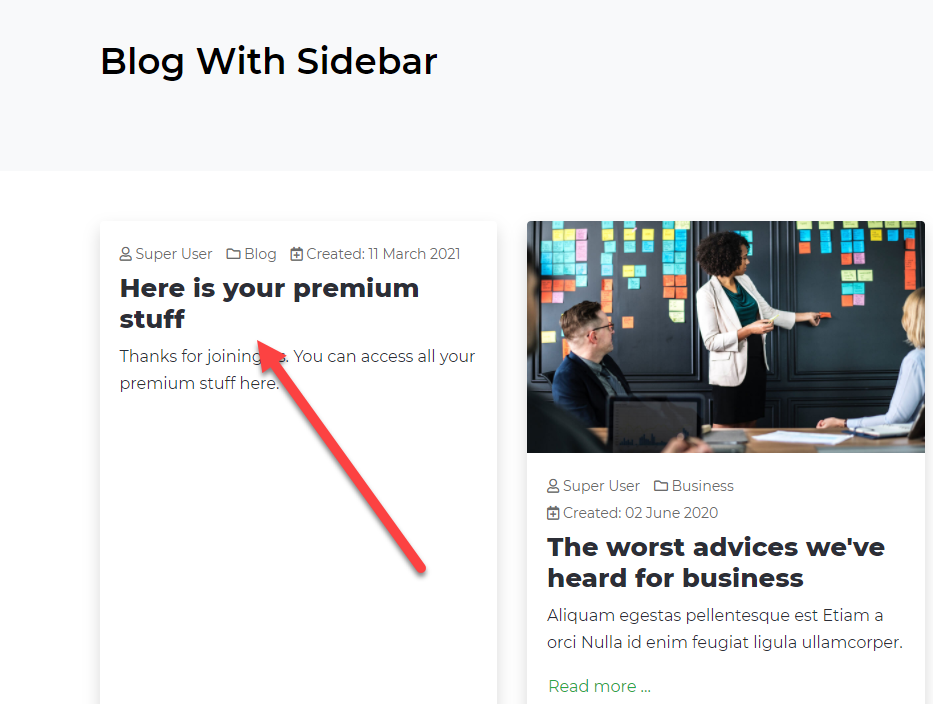
Now repeat the steps to create content for registered users. Add Title and content which you want to display to registered users. And set the access level to Registered.
Testing Your Site
To test your website, you need to create a registered user to test for logged-in users. So if you don't have any registered user, create a user.
Now, visit your public website and check for the articles you have published. You will see the article, which is set to Guest.
Now, I will log in to my account and will see the results.
This is how you can use the Guest feature of Joomla. You can use this same process with menu items and modules for even more content hiding and showing.
Let us know if you have used this Joomla feature or not.
]]>