Have you heard about Google Search Console prevously known as Google Webmaster Tool?
Have you added your Joomla site to Google Search console?
If not,
...you are making one of the biggest mistakes of Joomla SEO.
Google Search Console offers specific webmaster tool to help a website owner or webmaster to monitor and maintain its search presence.
So, it is essential to add your Joomla website to Google Search Console.
Google Search Console helps you :
- To track search ranking
- To submit new content for indexing
- To adding Sitemap
- To delete or hide content from the Google Search
- To find out what search terms driving most of the traffic.
- To find out which landing page is performing better and many more things.
In this guide, we will learn how to set up Google Search Console and how to verify your Joomla website for Google Search Console.
Adding Your Joomla Site to Google Search Console
Sign Up for Google Search Console
To get started; first, you need to visit Google Search Console official website. And there you will find a Start Now button. Click on it.

Next, you need to log in. You can signin with your Gmail/Google account.
Once you logged in successfully, you need to add your property.
If you have already any website listed there with your account, you will see its dashboard, otherwise, you will be asked to add your website.
There are two ways to add your website.
- URL-prefix property - Includes only URLs with the specified prefix, including the protocol (http/https). If you want your property to match any protocol or subdomain (http/https/www./m. and so on), consider adding a Domain property instead.
- Domain property - A domain-level property that Includes all subdomains (m, www, and so on) and multiple protocols (http, https, FTP).
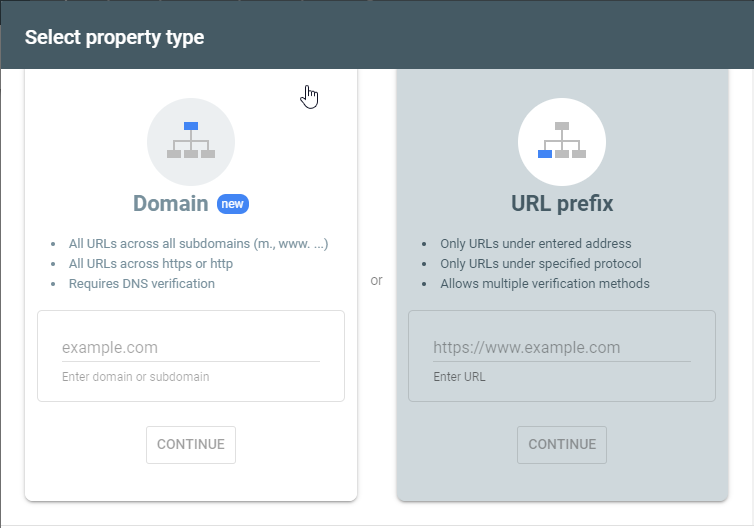
I will suggest you go with the URL Prefix type as it is more flexible.
Keep in mind that Google considers HTTP & HTTPS different protocols and websites with www & without www are also considered are two different websites. So, you need to enter the correct URL of your website. To learn more about adding a website property, check out its official guidelines.
Once you have entered the correct URL of your Joomla website, now click on Continue button and Google will start verifying your website.
In a few moments, Google Search Console will come with Ownership verification methods. You can choose any of them and verify your ownership.

I either choose the HTML file or HTML tag to verify the ownership. So in this example, I will use the HTML Tag method for verification.
Click on the HTML Tag to expand it and then copy the given meta tag from there. You need to add this code within the <head> section, before the first <body> section.

Verifying property ownership
We will use template framework settings to insert the meta tag within your header section. You can also add the code directly in the index.php file. But it is not good because when there is any update on the theme, your code will be deleted.
And Google periodically checks the tag, and if it doesn’t find the code on your website, it will disable your access from the Search console.
Using Astroid Based Templates
If you are using any Astroid based template, you can easily insert the code from the template backend. The Astroid framework provides features to add custom code in different places.
Navigate to Extensions > Templates > Styles. Select the template and open its template options.
Under the Custom Code, paste your meta tag within the Tracking Code field. It will render under the header section.

At last click the Save button in the top-left corner
Using Helix 3 Based Templates
Helix 3 also offers you to insert the custom codes directly from the backend without editing any file. So if you are using the Helix 3 based template, navigate to template options and find our Custom Code tab. Paste your meta tag under Before </head> field.
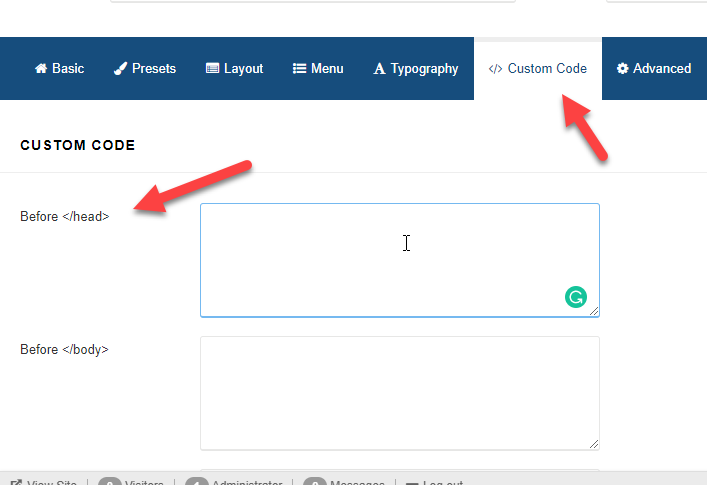
At last click the Save button in the top-left corner
Using Helix Ultimate Based Templates
Like Astroid and Helix 3, Helix Ultimate also has the same option to insert any code to the header section directly from the backend.
So if you are using any Helix Ultimate framework based template, navigate to the template options and find out Custom Code tab. Once you open it, you will Before </head> field with text area. Paste your meta tag here.

At last click the Save button.
Using T3 Based Templates
The T3 framework is also one of the most powerful frameworks. Like other frameworks, it also has a feature for custom codes.
So if you are using any T3 based template for your Joomla website, follow the steps.
Navigate to Extensions > Templates > Style and select your template.
You will be redirected to the template option page. Find the Custom Code tab and insert your code at Before </head> field.

At last hit Save button.
Using Gantry Based Templates
Gantry is the most favourite framework for many Joomla designers, and they love to use it. And if you are also using any Gantry or Gantry 5 based template. You need to follow these steps.
Navigate to Extensions > Templates > Styles > select your your template.
You will have all the template section on your screen. Find out the Page Settings tab.
Under Head Properties, there is a field called Custom Content. Paste your meta tag here and save your page settings.

This way, you can add the meta tag to your Joomla website.
Once the tag is inserted on your website, now go back to your Google Search Console.
Under the HTML Tag, you will find the Verify button. Click on it.
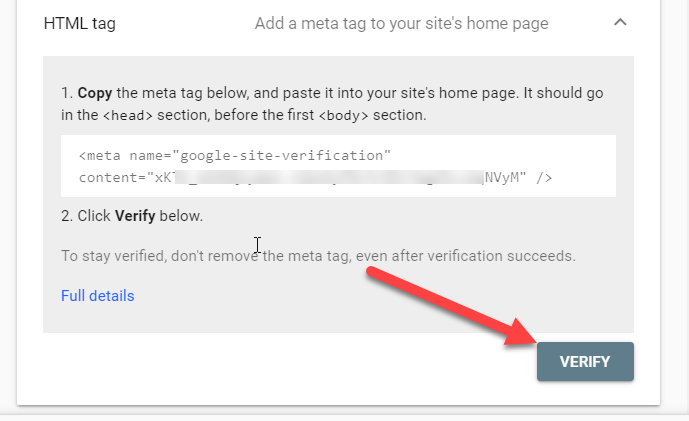
Google Search Console will now look for the HTML tag in your website code and will show you a success message.

Thats all. Now, you have successfully added your website to Google Search Console and also finish one more step to optimise your Joomla website for better SEO.